An analysis of how slab thickness, reinforcement, and drainage specifications affect long-term metal building performance. Data from industry standards and field observations across US markets.
If you are planning a pre-engineered metal building, here is something worth knowing before you pour a single yard of concrete. The foundation is where most metal building projects go wrong.
Not the steel. The steel arrives engineered down to the bolt hole, with wind and snow ratings specified in pounds per square foot (PSF). The concrete slab underneath? That often gets designed using a contractor's best guess.
The Metal Building Manufacturers Association (MBMA) has documented that foundation-related issues account for a disproportionate share of post-construction warranty claims in the pre-engineered building sector. The root cause is almost always the same: the slab was designed independently of the building, without referencing the actual loads, anchor patterns, and site conditions that the structure requires.
This article walks through what the standards actually require and what you can do to close the most common specification gaps before they become costly problems.
Slab Thickness and What the Standards Actually Require
The default specification across much of the industry is 4 inches thick with 3,000 PSI (Pounds per Square Inch) concrete. For light-use applications like carports and personal storage, that is adequate. But most metal buildings are not light-use applications. If you are parking trucks, operating a forklift, or installing a vehicle lift, a 4-inch slab is not designed to support the loads it will see.
The American Concrete Institute (ACI) addresses this through ACI 360R, which accounts for column point loads, vehicle traffic, storage loads, and wind uplift forces. When you factor in what the building actually demands, the specification picture changes.
In practice, the decision comes down to two choices: 4 inches or 6 inches. If your building will see vehicle traffic, heavy equipment, or will be habitable, 6 inches is the right call. The cost difference for a 2,400-square-foot slab is roughly $1,500 to $3,000. The cost of remediating a cracked slab after a building is erected on it starts at $10,000.
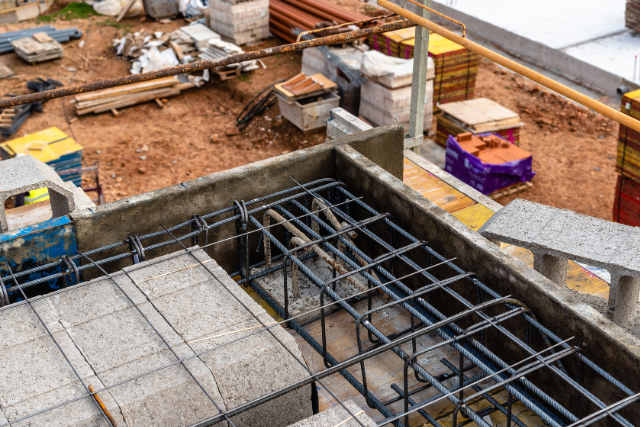
Reinforcement and What Actually Prevents Cracking
Concrete handles weight pushing down on it very well, but it struggles with forces that pull it apart. Every slab will crack. Reinforcement determines whether those cracks are controlled or catastrophic.
Welded wire mesh is the most common reinforcement in light-use slabs, but it only works if properly positioned in the upper third of the slab. In practice, the mesh often ends up on the ground beneath the concrete, rendering it structurally useless. Research published by the ACI has shown that improperly placed mesh performs no better than unreinforced concrete.
Rebar grid is the stronger choice. The industry standard for metal building slabs is Number 3 rebar (3/8-inch diameter) placed on 18-inch centers in both directions. For thickened edge footings, where column loads are concentrated, heavier Number 4 rebar (1/2-inch diameter) is standard. The MBMA recommends continuous rebar in perimeter footings with a minimum of two Number 4 bars for buildings up to 30 feet wide.
Fiber reinforcement (synthetic or steel fiber added to the mix) helps control shrinkage cracking but does not replace structural rebar. Think of it as a supplement, not a substitute.
If you are building anything beyond a basic carport, a #3 rebar grid in the slab with #4 rebar in the footers is the specification worth requesting. The additional $0.75 to $1.50 per square foot is a fraction of what structural crack repairs would cost.
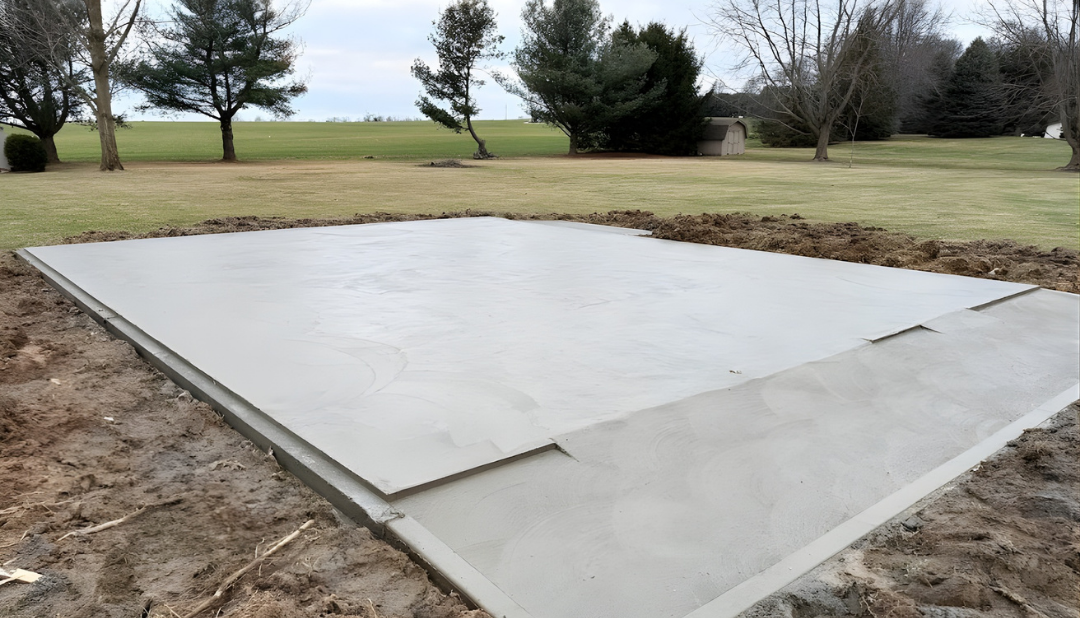
Monolithic Slabs Versus Stem Wall Foundations
Your climate zone usually decides which foundation type you need.
Monolithic slabs are poured in a single operation with integrated thickened edge footings, typically 12 inches wide and 12 inches deep. This is the faster, less expensive option and works well in moderate-to-warm climates where frost depth is not a concern.
Stem wall foundations separate the footing from the interior slab. The footings extend below the frost line, which can reach 48 inches or deeper in northern states. The International Building Code (IBC) specifies minimum frost depth by jurisdiction, and a monolithic slab will not pass inspection where deep frost footings are required. For habitable structures like barndominiums, stem wall foundations are strongly preferred, regardless of climate, due to their structural rigidity and the ability to run plumbing before the slab pour.
Anchor Bolt Coordination and the Number One Installation Failure
The bolt pattern anchoring your building to the slab must align precisely with the column base plates. For a typical building with 5-foot on-center (OC) spacing, anchors are placed within 6 inches of every column location. Even a 1-inch misalignment can prevent a column from seating properly.
This is how it typically goes wrong. The concrete contractor pours the slab using generic dimensions. The building arrives with a specific anchor bolt plan that does not match. The options at that point are all expensive: core drilling, base plate modifications, or, in the worst case, tearing out and repouring the perimeter.
The fix costs nothing. The building manufacturer's foundation drawings must be in the concrete contractor's hands before any forms are set. For post-installed wedge anchors, the standard specification is a 1/2-inch diameter with a minimum embedment depth of 4 inches. The concrete must cure a minimum of 28 days before anchors are installed.
Moisture, Drainage, and the Details That Prevent Long-Term Damage
A 10-mil or 15-mil polyethylene vapor barrier beneath the slab costs $200 to $400 for a 2,400-square-foot building. Skipping it in an enclosed building leads to moisture wicking upward through the concrete, resulting in condensation, mold growth, and corrosion. Remediation routinely exceeds $5,000. The EPA recommends vapor barriers for any enclosed slab-on-grade construction.
Site grading matters equally. The International Residential Code (IRC) requires the finished grade to slope away from the foundation at 6 inches of fall within the first 10 feet. A 4-inch compacted gravel base beneath the slab provides drainage and acts as a capillary break against ground moisture.
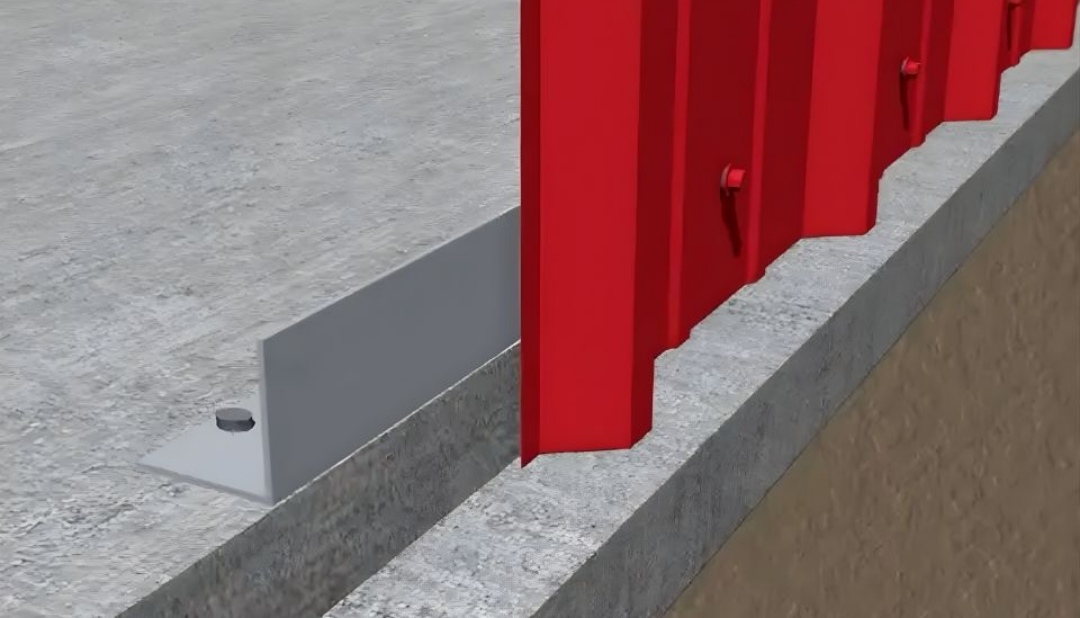
One detail worth highlighting is the notched edge, sometimes called a drip ledge. The slab perimeter extends 3 to 5 inches beyond the building footprint and drops 3/4 to 1-1/2 inches below the interior elevation. Metal wall panels overlap this edge, preventing water from running under the base rail. It also works as a rodent barrier. This detail adds less than $500 and eliminates the most common source of water intrusion at the base of enclosed metal buildings.
Specification Summary by Building Use Case
This table consolidates everything above into a single reference you can hand to your concrete contractor.
Sources: ACI 360R; MBMA Metal Building Systems Manual; IBC Chapter 19 (Concrete); IRC Section R403 (Footings).
The Coordination Gap and How to Close It
The most persistent source of foundation problems is not technical. It is organizational. You order the building from a manufacturer, hire a local concrete contractor separately, and the foundation drawings either arrive late, get filed without review, or get overridden by the concrete crew's field experience. The result is a slab that is close but not correct.
If you are managing one of these projects, this five-step sequence prevents the problem:
- Order the building first. Get the engineering completed and foundation drawings in hand.
- Share the foundation drawings with your concrete contractor. Walk through the anchor bolt plan, slab dimensions, footing depths, and the notched edge detail.
- Verify the slab dimensions match the building footprint exactly. Metal building measurements are typically outside edge to outside edge of the frame.
- Schedule the pour and allow proper cure time. A minimum of 28 days before the erection crew arrives.
- Send photos of the completed slab to the building manufacturer to verify dimensions before shipping.
Every foundation problem described in this article, the cracking, the settling, the anchor misalignment, the moisture intrusion, is preventable with this coordination. The specifications are published. The engineering is available. The only missing piece is making sure the right drawings are in the right hands at the right time.
What the Data Points Toward
The cost difference between a minimally adequate foundation and a properly specified one is modest. Upgrading from 4 inches to 6 inches. Rebar instead of mesh. A vapor barrier. A notched edge. Collectively, these add 10 to 15 percent to the foundation cost. Against a building expected to perform for 30 to 50 years, that is the most cost-effective line item in the entire project.
The projects that follow this process do not generate warranty claims, remediation costs, or callbacks. The projects that skip it reliably do.

.png)

TOP STORIES
View AllRECOMMENDED